1.3 Button and Input Control
Input controls
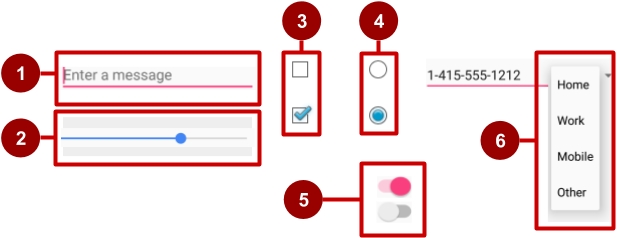
There are views that exist specifically to accept data input. Here are a few of the more commonly used input controls available to you:

EditView: used to input and edit textSeekBar: used to represent a range of inputsCheckBox: used for selecting multiple optionsRadioGroupandRadioButton: used for selecting one optionSwitch: used to enable and disable functionsSpinner: used to select an item from a list
Great that all these elements exist! Now how do we actually implement them?
Implementing a Button
Buttons are one of the most fundamental components in Android allowing the user to interact with the screen. The input controls above are because a button must take in user feedback and change the view accordingly, implementing a button requires us to add code to both the XML file and the class file.
Here’s what a button may look like when it is added to the XML file. You'll notice that we set the three important attributes: height, width, and id.
In our class, we just need to get a reference to the Button object and set an on click listener so that the button can function if the user clicks on it. Kotlin has auto-generated a variable for it with the same name as the id, so remember to use unique and understandable names for those.
It is possible to set the onClick attribute directly in the XML files. We advise against setting that attribute there, as it’s much cleaner to keep all logic related code out of the XML files.
Other Listeners
Each input control has its own set of listeners and functions that are used to change its behavior. Often times, the best way to find out what listeners are available to you is to start typing “inputView.set…” and scroll through the auto-complete options, where inputView is a pointer to a View.
The official Android documentation on what different listeners are available for each element is also quite good. Here is an example of how we would add a listener to perform actions when the text inside an EditText changes:
Hopefully you now have a larger inventory of views and input controls to use in your forays into the Android World.
Last updated
Was this helpful?