Intro to Android Development
  • Welcome
  • Syllabus
  • Hack Challenge
  • Resources
    • Lecture Videos
    • Ed Discussion
    • Git & GitHub Help/How-To
    • Setting up Android Studio
    • Starting an Android Studio Project & Making an Emulator
    • Importing, Exporting, & Submitting Your Projects to CMS
  • SP25 Course Material
    • Week 1 | Course Logistics, Kotlin, & Basic UI
      • Relevant Links
      • Demo/Lecture: Eatery Card
      • A0: Eatery Card (Follow-Along)
    • Week 2 | States, Components, LazyColumn
      • Relevant Links
      • Demo: Todo List
      • A2: Shopping List
    • Week 3 | Navigation & Animations
      • Relevant Links
      • Demo: Onboarding
      • A3: Stock Trading (RobbingGood)
    • Week 4 | MVVM and Flows
      • Relevant Links
      • Demo: Eatery Card 2
      • A4: Chat of a Lifetime
    • Week 5 | Dumb Components & UIEvents
      • Relevant Links
      • Demo: Music Player
      • A5: Rate My Vibe
    • Week 6 | Coroutines, Networking, JSON
      • Relevant Links
      • Demo: Retrofit
      • A6: You Should Even Lift, Bro.
  • Bonus Week | Android Job Search
    • Relevant Links
    • Android Technical Interview Question!
  • Textbook
    • 1. Introduction to the Editor and Views
      • 1.1 Introduction to the Editor
      • 1.2 SDK Management
      • 1.3 Kotlin Overview
      • 1.4 Views
      • 1.5 Android Studio Project Demo + Understanding The Editor
    • 2. Jetpack Compose
      • 2.1 Introduction
      • 2.2 Layouts
      • 2.3 Modifiers
      • 2.4 Animations
      • 2.5 Lazy Lists
      • 2.6 Reactive UI
    • 3. Intents and Manifest
      • 3.1 Activities
      • 3.2 Implicit Intents
      • 3.3 Explicit Intents
      • 3.4 Manifest
      • 3.5 Permissions
      • 3.6 Summary
    • 4. Navigation
      • 4.1 Types of Navigation
      • 4.2 Implementation of the Bottom Navigation Bar
    • 5. Data and Persistent Storage
      • 5.1 Singleton Classes
      • 5.2 Shared Preferences
      • 5.3 Rooms
      • 5.4 Entities
      • 5.5 Data Access Objects
      • 5.6 Databases
    • 5.5 Concurrency
      • 5.5.1 Coroutines
      • 5.5.2 Implementation of Coroutines
      • 5.5.3 Coroutines with Networking Calls
    • 6. Networking and 3rd Party libraries
      • 6.1 HTTP Overview
      • 6.2 3rd Party Libraries
      • 6.3 JSON and Moshi
      • 6.4 Retrofit
      • 6.5 Summary
    • 7. MVVM Design Pattern
      • 7.1 Key Idea
      • 7.2 Implementation Ideas
    • 8. Flows
    • 9. The Art and Ontology of Software
    • 10. 🔥 Firebase
      • 10.1 Setting up Firebase
      • 10.2 Authentication
      • 10.3 Analytics
      • 10.4 Messaging
      • 10.5 Firestore
  • Additional Topics
    • Git and GitHub
    • Exporting to APK
  • Archive
    • Archived Native Android Textbook Pages
      • 1. Layouts and More Views
        • 1.1 File Structure and File Types
        • 1.2 Resource Files
        • 1.3 Button and Input Control
        • 1.4 ViewGroups
        • 1.5 Summary + A Note On Chapter 2 Topics
      • 2. RecyclerViews
        • 2.1 RecyclerViews
        • 2.2 RecyclerView Performance
        • 2.3 Implementation of a Recycler View
        • 2.4 Implementation with Input Controls
        • 2.5 Filtering RecyclerViews
        • 2.6 Recyclerview Demo
      • 3. ListViews and Searching
        • 3.1 ListView vs. RecyclerView
        • 3.2 ListView Performance
        • 3.3 Implementation of a ListView
        • 3.4 Searching in a List View
      • 4. Fragments
        • 4.1 What are Fragments?
        • 4.2 Lifecycle of a Fragment
        • 4.3 Integrating a Fragment into an Activity
        • 4.4 Sharing Data Between Fragments
        • 4.5 Fragment Slide Shows
      • 5. OkHttp
      • 6. Activity Lifecycle
      • 7. Implementation of Tab Layout
    • Fall 2024 Course Material
      • Lecture 1 & Exercise 1: Introduction to Android
      • Lecture 1.5: Beauty of Kotlin
      • Lecture 2 & HW 2: Modifiers, Lazylists and Reactive UI
      • Lecture 3 & HW 3: Animations, Intents and Manifest
      • Lecture 4 & HW 4: Coroutines & Navigation
      • Lecture 5 & HW 5: Persistent Storage, Networking, and JSON Parsing
      • Lecture 6 & HW 6: MVVM, Flows
      • Bonus Lectures & Bonus HW
      • Bonus Lecture: Industry Practice
    • Spring 2024 Course Material
      • Lecture 1 & Exercise 1: Introduction to Android
      • Lecture 4 & HW 4: LazyLists
      • Lecture 6 & HW 6: Networking, Data, and Persistent Storage
    • Spring 2020 Course Material
      • Week 1: Intro to the Editor
      • Week 2: Views and Layouts
      • Week 3: Intent and Manifest
      • Week 4: ListView and RecyclerView
      • Week 5: Fragments
      • Week 6: Networking
    • Spring 2021 Lecture & HW 8: Networking & 3rd Party APIs
    • HackOurCampus Workshop
Powered by GitBook
On this page
  • Input controls
  • Implementing a Button
  • Other Listeners

Was this helpful?

  1. Archive
  2. Archived Native Android Textbook Pages
  3. 1. Layouts and More Views

1.3 Button and Input Control

Previous1.2 Resource FilesNext1.4 ViewGroups

Last updated 7 months ago

Was this helpful?

Input controls

There are views that exist specifically to accept data input. Here are a few of the more commonly used input controls available to you:
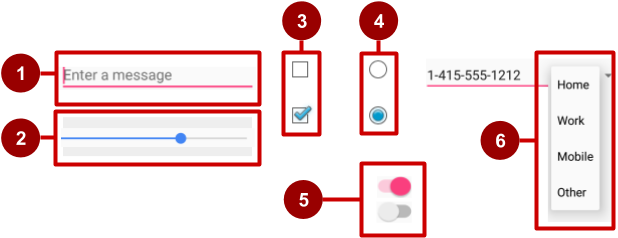
User input controls

  1. EditView: used to input and edit text

  2. SeekBar: used to represent a range of inputs

  3. CheckBox: used for selecting multiple options

  4. RadioGroup and RadioButton: used for selecting one option

  5. Switch: used to enable and disable functions

  6. Spinner: used to select an item from a list

Great that all these elements exist! Now how do we actually implement them?

Implementing a Button

Buttons are one of the most fundamental components in Android allowing the user to interact with the screen. The input controls above are because a button must take in user feedback and change the view accordingly, implementing a button requires us to add code to both the XML file and the class file.

Here’s what a button may look like when it is added to the XML file. You'll notice that we set the three important attributes: height, width, and id.

activity_main.xml
<Button
     android:layout_width="wrap_content"
     android:layout_height="wrap_content" 
     android:id="@+id/first_button"
     <!-- more attributes ... --> 
 />

In our class, we just need to get a reference to the Button object and set an on click listener so that the button can function if the user clicks on it. Kotlin has auto-generated a variable for it with the same name as the id, so remember to use unique and understandable names for those.

MainActivity.kt
first_button.setOnClickListener(){
    // Do something in response to button click
}

It is possible to set the onClick attribute directly in the XML files. We advise against setting that attribute there, as it’s much cleaner to keep all logic related code out of the XML files.

Other Listeners

Each input control has its own set of listeners and functions that are used to change its behavior. Often times, the best way to find out what listeners are available to you is to start typing “inputView.set…” and scroll through the auto-complete options, where inputView is a pointer to a View.

The official Android documentation on what different listeners are available for each element is also quite good. Here is an example of how we would add a listener to perform actions when the text inside an EditText changes:

editText.addTextChangedListener(object : TextWatcher {
 
    override fun afterTextChanged(s: Editable) {
       // Do Something
    }
 
    override fun beforeTextChanged(s: CharSequence, start: Int,
                                   count: Int, after: Int) {
       // Do Something
    }
 
    override fun onTextChanged(s: CharSequence, start: Int,
                               before: Int, count: Int) {
       // Do Something
    }
})

Hopefully you now have a larger inventory of views and input controls to use in your forays into the Android World.